


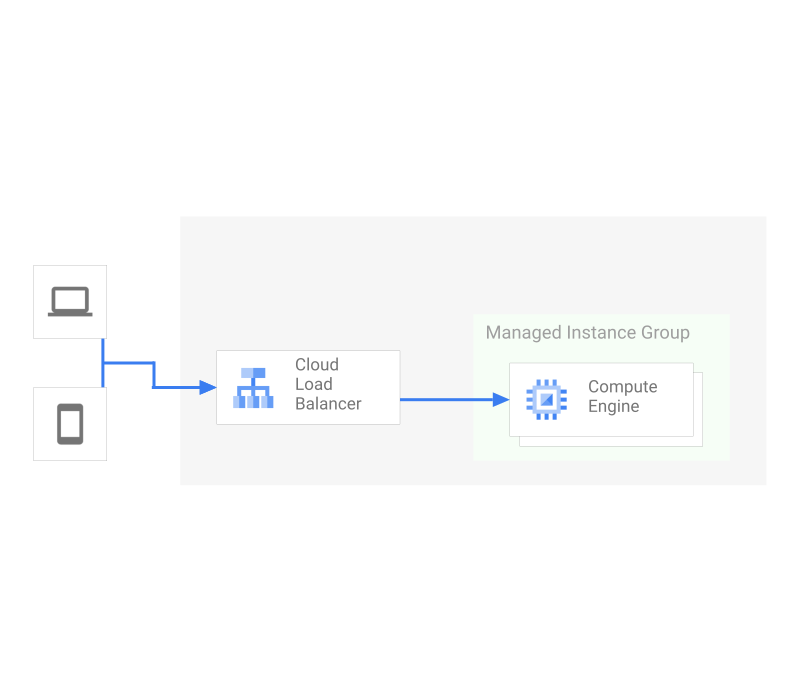
Load Balanced Vms 是基礎架構建構指令碼,可設定 VM 叢集,並設定負載平衡器,將 VM 的公開路徑公開:
- 運算 - VM - Compute Engine
- 運算 - 叢集 - 代管執行個體群組
- Compute - Machine Template - Instance Template
- 網路 - 負載平衡 - Cloud Load Balancer
這個範例應用程式會使用 NGINX 設定簡單的靜態 HTML 網站,並在叢集之間進行負載平衡。
開始使用
按一下下列連結,即可在 Cloud Shell 中複製原始碼。完成後,只要執行單一指令,即可在專案中啟動應用程式的工作副本。

負載平衡 VM 元件
已平衡負載的 VM 架構會使用多項產品。 下表列出各項元件,並提供元件的相關資訊,包括相關影片、產品說明文件和互動式導覽的連結。| 影片 | 文件 | 逐步操作說明 | |||
|---|---|---|---|---|---|
 |
Compute Engine | Compute Engine 是 Google Cloud 的虛擬技術。您可以透過這項服務啟動多種 VM 設定,滿足各種運算需求。 | |||
 |
Cloud Load Balancing | Google Cloud Load Balancer 可讓您在 Storage Bucket 前方放置負載平衡器,以便使用 SSL 憑證、記錄和監控功能。 |
指令碼
安裝指令碼會使用以 go 撰寫的可執行檔和 Terraform CLI 工具,在空白專案中安裝應用程式。輸出內容應為可運作的應用程式,以及負載平衡 IP 位址的網址。
./main.tf
啟用服務
專案預設會停用 Google Cloud 服務。 啟用下列必要服務:
- Compute Engine - 虛擬機器和網路服務 (例如負載平衡器)
variable "gcp_service_list" {
  description = "The list of apis necessary for the project"
  type        = list(string)
  default = [
      "compute.googleapis.com",
  ]
}

resource "google_project_service" "all" {
  for_each                   = toset(var.gcp_service_list)
  project                    = var.project_number
  service                    = each.key
  disable_dependent_services = false
  disable_on_destroy         = false
}
建立執行個體範本,做為代管 VM 的基礎
下列指令會建立 VM、在 VM 上安裝必要軟體,並部署程式碼。
resource "google_compute_instance" "exemplar" {
    name         = "${var.basename}-exemplar"
    machine_type = "n1-standard-1"
    zone         = var.zone
    project      = var.project_id

    tags                    = ["http-server"]
    metadata_startup_script = "apt-get update -y \n apt-get install nginx -y \n  printf '${data.local_file.index.content}'  | tee /var/www/html/index.html \n chgrp root /var/www/html/index.html \n chown root /var/www/html/index.html \n chmod +r /var/www/html/index.html"

    boot_disk {
        auto_delete = true
        device_name = "${var.basename}-exemplar"
        initialize_params {
        image = "family/debian-10"
        size  = 200
        type  = "pd-standard"
        }
    }

    network_interface {
        network = "default"
        access_config {
        // Ephemeral public IP
        }
    }

    depends_on = [google_project_service.all]
}
建立快照和磁碟映像檔
下列指令會使用 VM 建立快照。 然後使用快照建立磁碟映像檔。叢集中的所有 VM 都是以這個映像檔為基礎。
resource "google_compute_snapshot" "snapshot" {
    project           = var.project_id
    name              = "${var.basename}-snapshot"
    source_disk       = google_compute_instance.exemplar.boot_disk[0].source
    zone              = var.zone
    storage_locations = ["${var.region}"]
    depends_on        = [time_sleep.startup_completion]
}

resource "google_compute_image" "exemplar" {
    project         = var.project_id
    name            = "${var.basename}-latest"
    family          = var.basename
    source_snapshot = google_compute_snapshot.snapshot.self_link
    depends_on      = [google_compute_snapshot.snapshot]
}
建立執行個體範本
下列指令會建立範本,其中包含叢集中所有 VM 的設定和配置。這會使用上一個指令建立的磁碟映像檔。
這項指令包含開機指令碼,可自訂叢集中 VM 提供的 HTML。
 resource "google_compute_instance_template" "default" {
    project     = var.project_id
    name        = "${var.basename}-template"
    description = "This template is used to create app server instances."
    tags        = ["httpserver"]

    metadata_startup_script = "sed -i.bak \"s/\{\{NODENAME\}\}/$HOSTNAME/\" /var/www/html/index.html"

    instance_description = "BasicLB node"
    machine_type         = "n1-standard-1"
    can_ip_forward       = false

    // Create a new boot disk from an image
    disk {
        source_image = google_compute_image.exemplar.self_link
        auto_delete  = true
        boot         = true
    }

    network_interface {
        network = "default"
    }

    depends_on = [google_compute_image.exemplar]
}
建立代管執行個體群組
要求將執行個體範本的 N 部機器納入這個群組進行管理。
resource "google_compute_instance_group_manager" "default" {
    project            = var.project_id
    name               = "${var.basename}-mig"
    zone               = var.zone
    target_size        = var.nodes
    base_instance_name = "${var.basename}-mig"


    version {
        instance_template = google_compute_instance_template.default.id
    }

    named_port {
        name = "http"
        port = "80"
    }

    depends_on = [google_compute_instance_template.default]
}
建立外部 IP 位址
用於將主機繫結至網域名稱,以及在網路上進行一般通訊。
resource "google_compute_global_address" "default" {
    project    = var.project_id
    name       = "${var.basename}-ip"
    ip_version = "IPV4"
}
建立負載平衡器
下列指令會建立負載平衡器,並實作健康狀態檢查和後端服務。這會設定負載平衡器,以便連線至執行個體群組。
resource "google_compute_health_check" "http" {
    project = var.project_id
    name    = "${var.basename}-health-chk"

    tcp_health_check {
        port = "80"
    }
}

resource "google_compute_firewall" "allow-health-check" {
    project       = var.project_id
    name          = "allow-health-check"
    network       = local.defaultnetwork
    source_ranges = ["130.211.0.0/22", "35.191.0.0/16"]

    allow {
        protocol = "tcp"
        ports    = ["80"]
    }
}

resource "google_compute_backend_service" "default" {
    project               = var.project_id
    name                  = "${var.basename}-service"
    load_balancing_scheme = "EXTERNAL"
    protocol              = "HTTP"
    port_name             = "http"
    backend {
        group = google_compute_instance_group_manager.default.instance_group
    }

    health_checks = [google_compute_health_check.http.id]
    }

    resource "google_compute_url_map" "lb" {
    project         = var.project_id
    name            = "${var.basename}-lb"
    default_service = google_compute_backend_service.default.id
}
啟用 HTTP
下列指令會設定網路規則,將負載平衡器上的通訊埠 80 指向服務。
resource "google_compute_target_http_proxy" "default" {
    project = var.project_id
    name    = "${var.basename}-lb-proxy"
    url_map = google_compute_url_map.lb.id
}

resource "google_compute_forwarding_rule" "google_compute_forwarding_rule" {
    project               = var.project_id
    name                  = "${var.basename}-http-lb-forwarding-rule"
    provider              = google-beta
    region                = "none"
    load_balancing_scheme = "EXTERNAL"
    port_range            = "80"
    target                = google_compute_target_http_proxy.default.id
    ip_address            = google_compute_global_address.default.id
}
結論
執行後,您應該會在專案中看到一個簡易網站,在多個 Compute Engine 執行個體上執行,並由負載平衡器做為前端。此外,您應該擁有所有程式碼,可修改或擴充這個解決方案,以符合您的環境。