


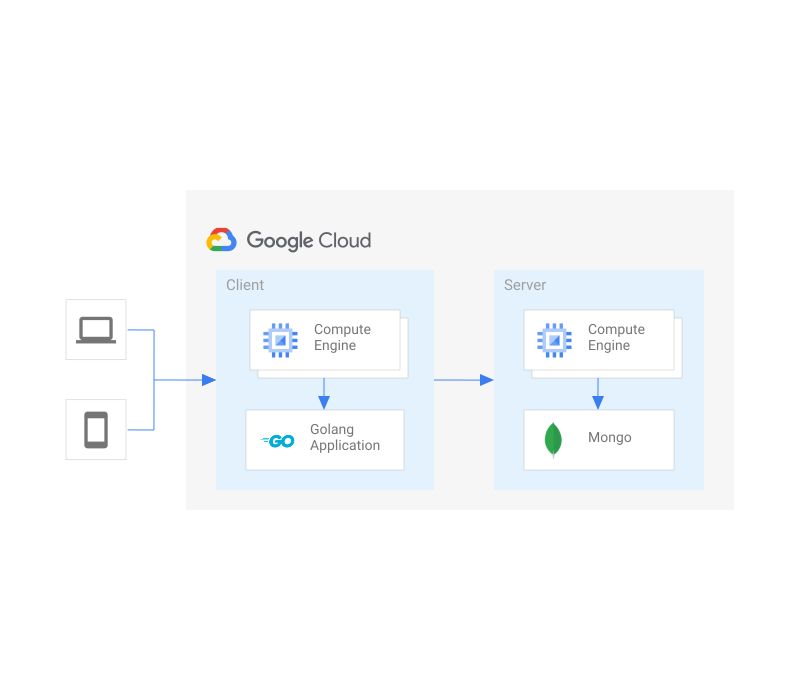
NoSQL Client Server 會設定並建立兩個 Compute Engine 執行個體:
- 伺服器 - 用於執行 MongoDB
- 用戶端:執行自訂 Go 應用程式,與 MongoDB 通訊,然後公開 API,供您從 MongoDB 取用資料
開始使用
按一下下列連結,即可在 Cloud Shell 中複製原始碼。完成後,只要執行單一指令,即可在專案中啟動應用程式的工作副本。

NoSQL 用戶端伺服器元件
NoSQL 用戶端伺服器架構會使用一項主要產品。 系統會醒目顯示該產品,並提供更多資訊,包括相關影片、產品說明文件和互動式導覽的連結。| 影片 | 文件 | 逐步操作說明 | |||
|---|---|---|---|---|---|
 |
Compute Engine | Compute Engine 是 Google Cloud 的虛擬技術。您可以透過這項服務啟動多種 VM 設定,滿足各種運算需求。 |
指令碼
安裝指令碼會使用以 go 撰寫的可執行檔和 Terraform CLI 工具,在空白專案中安裝應用程式。輸出內容應為可運作的應用程式,以及負載平衡 IP 位址的網址。
./main.tf
啟用服務
專案預設會停用 Google Cloud 服務。如要使用本文中的任何解決方案,請先啟用下列項目:
- Compute Engine:虛擬機器和網路
variable "gcp_service_list" {
    description = "The list of apis necessary for the project"
    type        = list(string)
    default = [
        "compute.googleapis.com",
    ]
}

resource "google_project_service" "all" {
  for_each                   = toset(var.gcp_service_list)
  project                    = var.project_number
  service                    = each.key
  disable_dependent_services = false
  disable_on_destroy         = false
}
建立防火牆規則
建立規則,在防火牆上開啟通訊埠 80,然後套用至標示為 http-server 的任何機器
resource "google_compute_firewall" "default-allow-http" {
  name    = "deploystack-allow-http"
  project = var.project_number
  network = "projects/${var.project_id}/global/networks/default"

  allow {
    protocol = "tcp"
    ports    = ["80"]
  }

  source_ranges = ["0.0.0.0/0"]

  target_tags = ["http-server"]
}
建立伺服器執行個體
啟動將做為伺服器的 VM,並提供 MongoDB
# Create Instances
resource "google_compute_instance" "server" {
  name         = "server"
  zone         = var.zone
  project      = var.project_id
  machine_type = "e2-standard-2"
  tags         = ["http-server"]


  boot_disk {
    auto_delete = true
    device_name = "server"
    initialize_params {
      image = "family/ubuntu-1804-lts"
      size  = 10
      type  = "pd-standard"
    }
  }

  network_interface {
    network = "default"
    access_config {
      // Ephemeral public IP
    }
  }

  metadata_startup_script = <<SCRIPT
    apt-get update
    apt-get install -y mongodb
    service mongodb stop
    sed -i 's/bind_ip = 127.0.0.1/bind_ip = 0.0.0.0/' /etc/mongodb.conf
    iptables -t nat -A PREROUTING -p tcp --dport 80 -j REDIRECT --to-port 27017
    service mongodb start
  SCRIPT
  depends_on              = [google_project_service.all]
}
建立用戶端執行個體
啟動 VM 做為用戶端,並從 MongoDB 取用資料
resource "google_compute_instance" "client" {
  name         = "client"
  zone         = var.zone
  project      = var.project_id
  machine_type = "e2-standard-2"
  tags         = ["http-server", "https-server"]

  boot_disk {
    auto_delete = true
    device_name = "client"
    initialize_params {
      image = "family/ubuntu-1804-lts"
      size  = 10
      type  = "pd-standard"
    }
  }

  network_interface {
    network = "default"

    access_config {
      // Ephemeral public IP
    }
  }

  metadata_startup_script = <<SCRIPT
    add-apt-repository ppa:longsleep/golang-backports -y && \
    apt update -y && \
    apt install golang-go -y
    mkdir /modcache
    mkdir /go
    mkdir /app && cd /app
    curl https://raw.githubusercontent.com/GoogleCloudPlatform/golang-samples/main/compute/quickstart/compute_quickstart_sample.go --output main.go
    go mod init exec
    GOPATH=/go GOMODCACHE=/modcache GOCACHE=/modcache go mod tidy
    GOPATH=/go GOMODCACHE=/modcache GOCACHE=/modcache go get -u
    sed -i 's/mongoport = "80"/mongoport = "27017"/' /app/main.go
    echo "GOPATH=/go GOMODCACHE=/modcache GOCACHE=/modcache HOST=${google_compute_instance.server.network_interface.0.network_ip} go run main.go"
    GOPATH=/go GOMODCACHE=/modcache GOCACHE=/modcache HOST=${google_compute_instance.server.network_interface.0.network_ip} go run main.go &
  SCRIPT

  depends_on = [google_project_service.all]
}
結論
執行後,您應該會看到使用 MongoDB 的主從式 API 在兩個 Compute Engine 執行個體上執行。此外,您應該擁有所有程式碼,可修改或擴充這個解決方案,以配合您的環境。