

This guide shows how to use the Dialogflow CX console to build and test a shirt ordering agent using flows. When interacting with this agent, ask for the store location, get store hours, or order a shirt.
The following diagram shows the completed agent for this guide:

Before you begin
Complete the following tasks before you read this guide:
- Read flow basics.
- Perform setup steps.
Create an agent
Create an agent for this guide:
- Open the Dialogflow CX console.
- Create or choose a project.
- Click Create agent.
- Select Build your own.
- Complete the form for basic agent settings:
- Enter a display name.
- Select a location. Click the Edit button if you want to change advanced location settings.
- Select a time zone.
- Select the default language.
- Optionally, enable Cloud Logging.
- Click Save.
Optional agent import
This guide walks you through the steps to build a shirt ordering agent.
To skip the console steps, download the agent and import it.
Default flow and intents
The following flow and intents are created automatically for a new agent.
You can find the intents by clicking Manage and then Intents, and you can find the flow by clicking Build.
| X | Item |
|---|---|
| Default Welcome Intent | The Default Welcome Intent has training phrases like "Hi" or "Hello" that are meant to match initial end-user input. You can edit this intent as needed. |
| Default Negative Intent | The Default Negative Intent can be used to add training phrases to this intent that act as negative examples. |
| Default Start Flow | The Default Start Flow can be used as your only flow. It is the only flow that will be used in this guide. For more complex agents, you can add more flows. This flow has a default intent route with the Default Welcome Intent as an intent requirement. |
Test default welcome response message
The default flow and intents can handle a basic conversation with only a welcome message.
To test your new agent:
- Click the Test Agent button to open the simulator.
- Enter
helloin the text field and press Enter. - The agent responds with a default welcome message.
- Close the simulator.
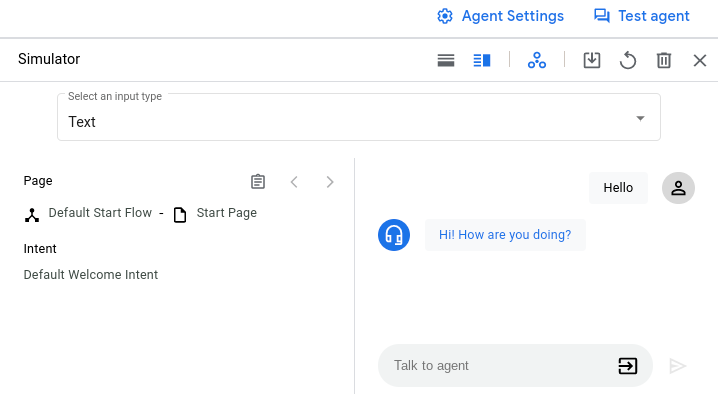
The agent performs the following steps for this end-user input:
- When you provide input, the agent evaluates the state handlers in scope for the active Default Start Flow and flow start page.
- The agent identifies a route that matches the Default Welcome Intent and executes it.
- The agent selects one of the fulfillment response messages at random and adds it to the response queue.
- Because the route has no transition target, the active flow and page remain unchanged.
- The agent sends the contents of the response queue to you.
Edit the welcome response message
To edit the welcome response message:
- Click the Build tab.
- Select the Default Start Flow in the Flows section.
- Click the Start Page node in the graph.
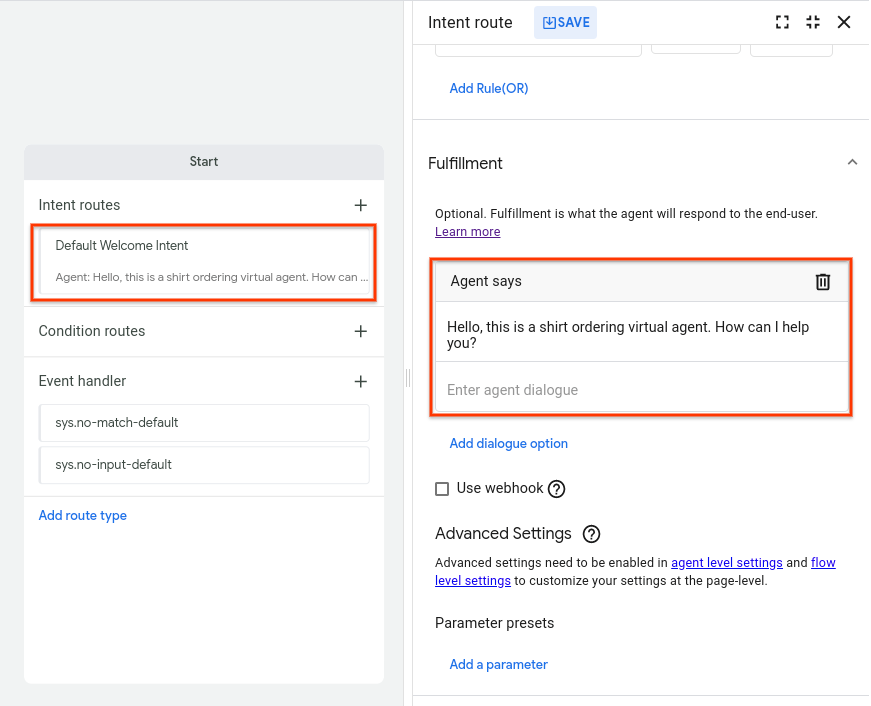
- Find the route with the Default Welcome Intent as an intent requirement and click it to open the route editing panel.
- In the fulfillment section, under the agent responses subsection, delete all existing response messages.
- Add
Hello, this is a shirt ordering virtual agent. How can I help you?as the only response. - Click Save.
- Close the route editing panel.
Test the updated welcome response message
To test your updated response:
- Click the Test Agent button to open the simulator.
- Enter
helloin the text field and press Enter. - The agent responds with your new message.
- Close the simulator.
Store location page
A Dialogflow CX conversation (session) can be described and visualized as a state machine. The states of a CX session are represented by pages. Because you only have one page, the agent is not very useful. In this section, create another page that handles questions about the store's location.
Create the location intent
An intent categorizes an end-user's intention for one conversation turn.
To create an intent that is matched when end-user input requests the store's location:
- Select the Manage tab.
- Click Intents.
- Click Create.
- Enter
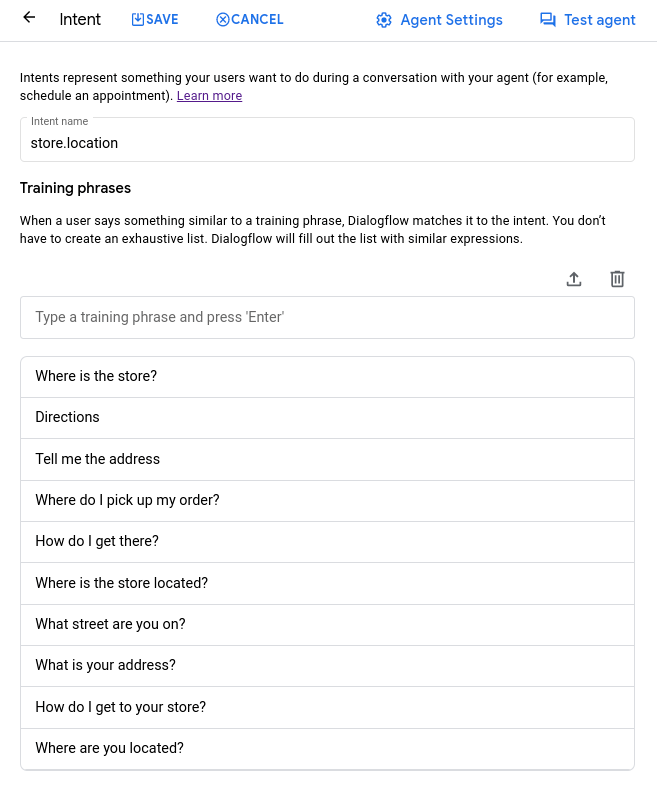
store.locationfor the intent display name. - Enter the following training phrases:
Where is the store?DirectionsTell me the addressWhere do I pick up my order?How do I get there?Where is the store located?What street are you on?What is your address?How do I get to your store?Where are you located?
- Click Save.
Create the location page
Create a new page. You can add an entry fulfillment to this page that runs whenever the page becomes active. This entry fulfillment should have a response message that provides the store's location.
To create the store location page:
- Click the Build tab.
- Select the Default Start Flow in the Flows section.
- Click the add add button in the Pages section. A text entry for the page display name appears.
- Enter
Store Locationfor the display name of the page and press Enter. - Click the more_vert more_vert button next to the page display name.
- Select Edit to open the page editing panel.
- Find Entry fulfillment and click Edit fulfillment.
- Click +Add dialogue response to enter
Our store is located at 1007 Mountain Drive, Gotham City, NJ.in the Agent dialogue field of the Agent responses section. - Click Save.
- Close the page editing panel.

Add a location intent route to the flow
Now, create a route that has the Store Location page as a transition target. When this route is called, the session transitions to the Store Location page. This route is applied to the Default Start Flow, so it is in scope as long as the flow is active.
For a single-flow agent, this means that the route is always in scope. At any point in the conversation, an end-user can ask for the store location, and this route will be called.
To create the route:
- Click the Build tab.
- Select the Default Start Flow in the Flows section.
- Click the Start Page node in the graph. This is the start page for the Default Start Flow.
- Add the following intent route:
- Intent:
store.location - Transition Page:
Store Location
- Intent:
- Click Save.
- Close the intent route editing panel.

After you close the editing panel, a node for your new page appears on the graph. The arrow from the Start node to the Store Location node shows how the session transitions between nodes.
Test the store location page
To test your page:
- Click the Test Agent button to open the simulator.
- Enter
What is the store location?and press the Enter key. - The agent provides the address.
- Close the simulator.
The agent performs the following steps for this end-user input:
- When you provide input, the agent evaluates the state handlers in scope for the active Default Start Flow and flow start page.
- The agent identifies a route that matches the store.location intent and executes it.
- Because the route has no fulfillment response messages, the agent adds nothing to the response queue.
- The agent transitions the session to the Store Location page.
- The agent adds the entry fulfillment response message from the Store Location page to the response queue.
- The agent sends the contents of the response queue to you.
Store hours page using inline creation
In this section, you create a Store Hours page that handles end-user questions about store hours. Previously, you created pages and intents from the Build and Manage tabs. This section shows you a faster way of creating these components with inline creation.
To inline create an intent route, intent, and page:
- Click the Start Page node in the graph.
- Next to Routes, click add Add. The intent route editing panel opens.
- In the Intent section, select New intent. The intent editing panel opens.
Create a
store.hoursintent with the following training phrases:What are your store hours?What time do you close?
Click Save. The intent editing panel closes.
Go to the Transition section in the route editing panel.
For Page transition, select New page.
Enter
Store Hoursin the text entry that appears.Click Save. The new page appears on the graph because there is now a transition that leads to it.
Close the route editing panel.
Add an entry fulfillment that provides the store hours, as you did for Store Location.
Close any open editing panels.
Order item page
Next, create a page that uses form parameters. When you request a new shirt order, the session transitions to this page, which collects the size and color for the shirt order.
Create a custom entity type for shirt size
Entity types control how data from end-user input is extracted. Dialogflow CX provides predefined system entities that match common data types, such as dates, times, colors, and email addresses. You can also create custom entities for specific data.
For this agent, you can use a system entity for the shirt color, but you need to create a custom entity for the shirt size.
The size entity type should have the following entity entries:
| Entity | Synonyms |
|---|---|
| Small | small, tiny, little |
| Medium | medium, regular, average |
| Large | large, big, giant |
To create the entity:
- Select the Manage tab.
- Click Entity Types.
- Click Create.
- Set the display name to
size. - Add the entity entries listed in the table.
- Click Save.
Create an order intent with intent parameters
You need an intent that is matched when the end-user requests a new shirt order. This intent should also optionally capture the chosen shirt color or size if the end-user provides that information initially.
Parameters are used to capture and reference values supplied by the end-user during a session. Each parameter has a display name and an entity type. Unlike raw end-user input, parameters are structured data that you can use to perform logic or generate responses.
You control how end-user data is extracted with intent matching by annotating parts of your training phrases and configuring the associated intent parameters.
For example, consider a training phrase like "What is the forecast tomorrow for
Tokyo?" You can annotate "tomorrow" with a date parameter and "Tokyo" with a
location parameter. When you annotate parts of a training phrase, Dialogflow CX
recognizes that these parts are just examples of actual values that can be
provided by end-users at runtime.
For an end-user input like "What is the forecast on Friday for Sydney?",
Dialogflow CX can extract the date parameter from "Friday" and the location
parameter from "Sydney".
To annotate a training phrase in the console:
- Highlight the part of the training phrase you want to annotate.
- Select the needed entity type from the list.
- Dialogflow creates a parameter in the following parameter table.
Create an intent named order.new by following these steps:
- For each phrase that contains a color, annotate the color with a
colorparameter and the@sys.colorsystem entity type. - For each phrase that contains a shirt size, annotate the size with a
sizeparameter and the@sizecustom entity type that you created earlier.
Your training phrases and parameters should look similar to the following:

Create an order page
Create a new order page:
- Display name:
New Order - Entry fulfillment:
Ok, let's start a new order.
Add a form to the order page
For each page, you can define a form, which is a list of parameters that should be collected from the end-user for the page. The agent interacts with the end-user for multiple conversation turns, until it has collected all of the required form parameters, also called page parameters. For each form parameter, you also provide prompts that the agent uses to request that information from the end-user. This process is called form filling.
When an end-user supplies intent parameters for an intent match, the intent parameters become session parameters. When a page initially becomes active, all of its form parameters are pre-filled with any session parameters that have the same name. So, if the end-user supplies size or color when the order.new intent is matched, these values are automatically filled for the form.
Define two required form parameters for the New Order page:
| Required | Display name | Entity type | Is list | Prompt |
|---|---|---|---|---|
| color | @sys.color | What color would you like? | ||
| size | @size | What size do you want? |
To add this form:
- Click the New Order page in the graph.
- Click the Parameters add button add to open the parameters editing panel.
- Add the parameters as described in the table above.
- Click Save.
- Close the parameters editing panel.
Add a order intent route to the flow
Add a route to the Default Start Flow that transitions to the New Order page when the end-user wants to make a new order:
- Intent: order.new
- Transition target page: New Order
Confirmation page
The final page confirms the order and ends the session.
Create the confirmation page
Create a confirmation page with a response that uses the session parameters to confirm the order:
- Display name:
Order Confirmation - Entry fulfillment:
You can pick up your order for a $session.params.size,
$session.params.color shirt in 7 to 10 business days. Goodbye.
Add condition routes to the order page
You can use conditions to determine whether a route is called. Conditions are commonly used to check whether a form is complete, or they are configured to always be called when evaluated.
To set conditions in the console, see the Set conditions documentation.
Add the following route to the order page, which is called when the order page form is filled. This condition route uses parameter references in its response to the end-user and transitions the session to the Order Confirmation page.
- Condition:
$page.params.status = "FINAL" - Agent Says:
You have selected a $session.params.size, $session.params.color shirt. - Transition Page:
Order Confirmation
Add the following route to the order page. This route runs for each conversational turn while the page is active and the condition route is evaluated. When the aforementioned condition is evaluated and called, the page becomes inactive, so this true condition route is not evaluated:
- Condition:
true - Agent Says:
I'd like to collect a bit more information from you.
Create a condition route to end the session
Add the following condition route to the Order Confirmation page to end the session after the page becomes active and its entry fulfillment is processed:
- Condition:
true - Transition Target Page:
End Session
Test the completed agent
Test the agent with the following dialogue:
| Dialogue | Explanation |
|---|---|
|
End-user: Hi Agent: Hello, this is a shirt ordering virtual agent. How can I help you? |
|
|
End-user: I want to buy a blue shirt Agent: Ok, let's start a new order. Agent: I'd like to collect a bit more information from you. Agent: What size do you want? |
|
|
End-user: large Agent: You have selected a large, blue shirt. Agent: You can pick up your order for a large blue shirt in 7 to 10 business days. Goodbye. |
|
Prepare for production
Before you run your agent in production, implement the Best practices for production.